I recently discovered this great video from Fusion featuring biographer Walter Issacson, in which he narrates a concise explanation of Albert Einstein's general theory of relativity in 3 minutes.
New Promo Video for BA in Media Comm
To help increase the exposure of the BA program in Media Communications at Webster University the Netherlands, I created a short promotional video to serve as an attention-grabber, and a visual interest tool. This short video was developed and rendered through Adobe AfterEffects CS6 last spring. The visual intent was to showcase the four production tracks in the program offered at our campus. To this end the video rolls through Media Communications, Interactive Digital Media, Photography, and Video Production.
The visual assets in the video are all videos, images, and graphics that are currently in use by the department in some form. Part of the mission of this video is to showcase not only what students can study, but to show them this by example of using images, and other assets that are actually from the department.
Bob Dotson (NBC Today Show) Visit
This past October 12th & 13th I had the great fortune to host Bob Dotson the renowned broadcast journalist and eight-time Emmy Award winner from the NBC Today Show at our campus in Leiden.
Low-Poly Mask Project
This short portrait project combined aspects of traditional portriture with low-poly paper masks. The results were rather fun, with a range of portraits that evoke a variety of “personalities” portrayed by the actor under the mask. The students that were photographed with their masks were asked to "play" a character using some props from their personal items.
Bringing back the Flash!
In a recent graduate course for Webster University (MEDC 5331: Communication Production Tools: Video) I was looking to create an experience for the students that would allow for a fun yet practical hands on in-class exercise that would allow them to practice recording high quality audio. This exercise would give the students the experience recording audio in a guided low stake environment where failure or technical issues can be addressed. What I developed was a quickfire based on recording an oldtimey radio show, from pre-television days. This in class activity served as an active learning experience in which students needed to move quickly to organize radio performance parts, and discuss and plan out how they would record this performance all within two hours.
Students rose to the challenge of this in-class assignment to recreate the 1935 radio performance of Flash Gordon “On the Planet Mongo”. This rendition of Flash Gordon Ep1 On the Planet Mongo was performed by Webster University Leiden Media Communication Students as part of a learning exercise on script reading and audio production. This recording is from the original script that aired on April 27th, 1935.
Project 5x5: a video vignette
What is Project 5x5?
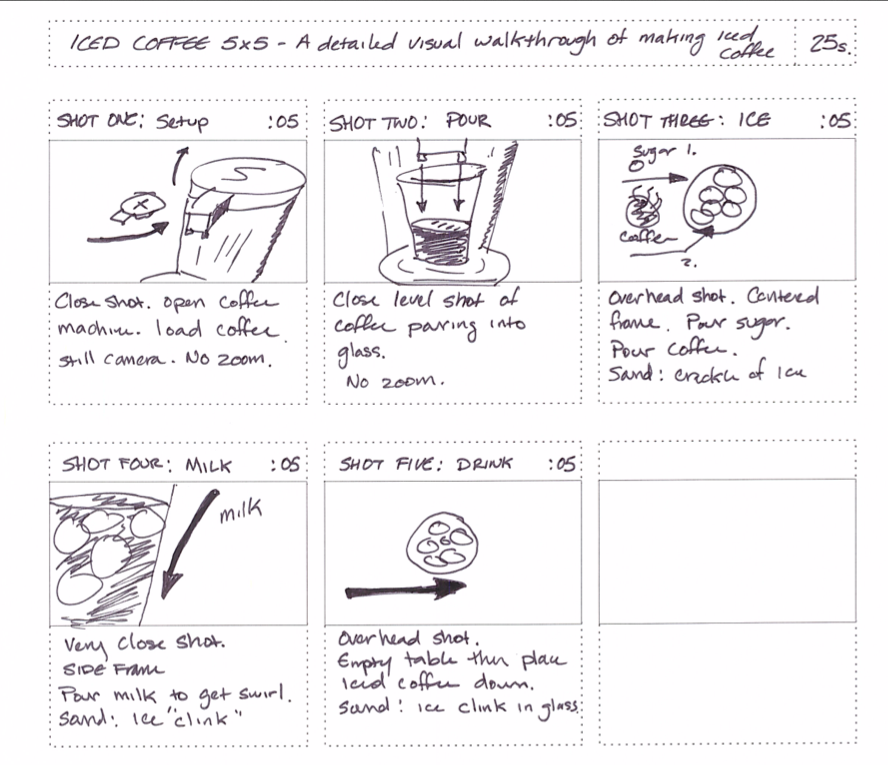
Project 5x5 is a short and simple video project. To shoot a 5x5 you need to come up with a story, or theme to use (this can be almost anything) and create 5 shots each 5 seconds long. Only the original audio is to be used, no additional audio tracks etc. Further, no use of titles, transitions, or credits, just pure video.
Project 5x5 has been around on vimeo for some time. The inspiration behind this post is the successful use of the 5x5 project to help teach video production students how to think in shots and to take a story or theme and distill it down to the bare essential components. One of the main advantages to using this project to teach video production is the highly structured yet simple parameters for the video. This allows students to focus on the steps and process of video production without letting the project get too big or complicated. This project lends itself nicely to be paired with a storyboard project as again, the main parameters of the video are set and are short and simple enough that it is not overwhelming. This short project allows students to go through the entire pre-production, production, and post-production phases of video production in a short amount of time with limited stress or confusion.
For the project I assigned, I broke the assignment up into two main parts, the written portion and the video portion. To complete the written portion, students go through the pre-production phase and develop a video "pitch" or concept that distills their story or theme into a one or two sentences. Students will then prepare a short but descriptive storyboard to go along with the pitch. Once completed, students move onto the production phase and shoot their 5x5. When all of their shots have been filmed they then move onto the post-production phase to edit the final video together. To edit the project, any non-linear video editng platform will do, for my class I had the students use Adobe Premiere Pro CS6, but any will do.
Storyboard:
Behind the Scenes:
Video Tutorial:
PHOT3190 - A new Class of Digital Artists
Course Description:
Students learn the theoretical and practical aspects of photographic digital imaging. Students develop a theoretical understanding of this technology and learn to apply these principles using Adobe Photoshop. Students learn to control, modify, and manipulate digital photographic images for both corrective and creative purposes.
In this course students used Adobe Photoshop (and Camera RAW) to explore the realm of digital image processing and manipulation. This course required students to look at taking imagery from a variety of sources and creating unique digital images. Students spent a lot of time on learning the Photoshop environment and how to work with digital files to bring their creative visions to life.
Reflection:
For this eight week course I used a scaffolding of projects to ratchet up the technical requirements (Photoshop manipulation skills) as well as increased creative control over the subject and composition of thier projects. In total, three course projects were used, each building upon the previous project. The first project (the most restrictive, and most simplistic) was focused on using state of the art equipment (cameras) and software (Photoshop) to re-create the visual aesthetics of vintage toy film cameras (styles made immensely popular via Instagram/Hipstamatic etc). The second project focused on the theme of the self portrait, but the students were to re-imagine what the essence of a self portrait is and explore ways to visually compose an image that encompasses their abstraction of the "self image". Finally, students were given an open ended project entitled the Uelsmann Experience, incorporating some of the free flowing design and creative process of image creation influenced by the legendary creative couple Jerry Uelsmann and Maggie Taylor. For this final project students were to come up with their own image theme and develop a creative strategy to accomplish their vision. This project can sometimes give "too" much creative freedom in which its vital to consult with each student to ensure the scope of their project is manageable in the timeframe of the course.
Throughout the course students engaged in small activities and in-class tutorial challenges focused on having the students learn new image manipulation techniques and put them to use in a time controlled environment. This challenge scenario was used to enforce my belief that in the creative process, especially in digital image creation the point of failure is where we learn the most about ourselves and the techniques used. For this class I wanted to create a "safe place to fail" - meaning I wanted the students to push themselves beyond their comfort zones and to try new techniques and ways of approaching the creative process without the fear that failing to succeed in their experiment would translate into an academic failure.
Overall, the individual growth demonstrated by each student, non only in technical proficiency, but in the creative process as artists was extensive. Students were able to demonstrate a clear and purposeful rationale behind the technical, aesthetic, and compositional elements of each of their completed project pieces.
To cap the course off on the last day I put together a short time-lapse video of the class picture I created from a series of individual portraits taken earlier in the course (under the guise of a hands on tutorial on portraiture). I wanted to use this simple image as both a visual "thank you" to the course, but to also serve as an example of how to re-imagine the "class picture" in a way that is contemporary and fun. A Super A3 poster was printed in class on the last day and signed by each of the students as a momento that will be proudly displayed in my office.
For more information you can checkout the open course website: PHOT3190 Spring 2013 Webster University Leiden
Award Winning Course Design
I am proud to share the news that one of the online courses I have taught and developed has been recognized with an award of excellence in instructional technology. The course CEP807/ED870 is the capstone course for the MAET Program at Michigan State University that requires students to develop an online portfolio sharing their academic, professional achievements and essay reflections. This course encompasses many features, but most prominently are: authentic audience, learning by doing, peer learning, and public scholarship.
For the full story and recap of the course design visit the official 2013 AT&T Award Competition in Instructional Technology site.
Star Wars Traceroute - #WookieHowl
Star Wars and TCP/IP what could be cooler? I have been wanting to share this since I first came across this great network hack back in February. This story made the rounds on all the popular tech blogs highlighting the work of Ryan Werber from Beagle Networks. To see how he actually pulled off this great hack (including the code he used) checkout the original post on Beagle Networks. Unfortunately the original traceroute has been discontinued due to repeated denial of service attacks after the popularity of the original posting. Thankfully, a new version (extended) has been posted that runs on IPv6. If you want to run this fun traceroute yourself you still can, instructions can be found in the blog post Special Treat! New Star Wars Traceroute. Traceroute - is a computer network diagnostic tool used to trace the path of packets of information as they are sent from one computer to another. The path of the packets are recorded at each node (or hop) in the network, relaying information on the time it takes to pas through each location. This Star Wars hack is a great example of controlling internal networking tables to display host names of all the various hops as lines from the Star Wars screen scroll from the opening sequence of Episode IV A New Hope.
Below is the original IPv4 traceroute from back in February (so glad I took a screenshot of it since its no longer available)
#WookieHowl!
Emotional Map Design - Experience iTunes
Experience to study: purchasing an album on iTunes.
Emotional Map – a visual representation of the user experience of purchasing an album through Apple’s iTunes music store. The Map can be read by using the vertical line to represent the main timeline of the process, with the horizontal text on the left indicating the individual steps in the process. The lettered notes are indicated within each step, then mapped in color that ranges from negative (blue) emotion to positive (red) emotional experience.
Latent opportunities are ubiquitous: Pick an environment For this emotional experience I have established that I will study my own emotional experience of purchasing a digital music album online.
Who or what to study: For this study I will map my emotional experience of purchasing a music album from Apple iTunes from my laptop computer.
Establish a goal: My goal for this study is to identify areas of my experience that could be improved upon based on my emotional response to the various aspects of the experience.
Establishing modes and identifying touch-points:Modes:
- Anticipation: Anticipation is the first mode, where the user reflects on the idea of purchasing a new album from iTunes. Reflecting on previous experiences of purchasing music through iTunes from various devices, and any feelings of excitement or trepidation that may shape how the interaction is approached.
- Launch (Enter): This is the second step where the user actually opens iTunes Store and gains access to the library of music, videos, podcasts, and other media available for purchase.
- Engage: This being the third step, is where most of the interaction takes place. This step is where the user interacts with the various components of the iTunes store and contain the majority of the touch-points of the purchasing process.
- Exit: This is the step in which you have completed the transaction and leave the iTunes Store environment after your purchase is completed.
- Reflection: The final stage in which you reflect upon the recent experience of purchasing an album through iTunes and how it compares to the anticipation stage from which previous experiences were used to foreshadow how the current experience would go.
Touch-points:
- Online: (Anticipation)
- browsing music online searching for something new.
- Finding a new band/song that is catchy and new.
- Looking them up to see what other works they have, and band info.
- Launching iTunes (Anticipation)
- Hoping that the artists album will be available.
- Looking forward to seeing if iTunes has other similar matches that would be new “discoveries”.
- Opening iTunes Store: (Launch/Enter)
- Waiting for store homepage to load.
- Notice the new items promoted on the homepage.
- Enjoying the design layout of the iTunes store.
- Noticing the clear separation of categorical items (music, movies, tv shows, apps, books).
- View Top Rated Charts (Engage)
- Notice the “young” music at the top.
- Surprised by what is downloaded most.
- Click on few songs that are unfamiliar by artist/name.
- Search for specific artist (Engage)
- Type in search field artist name
- Waiting for iTunes search to be completed
- notice the variety of search results showing multiple albums/tracks
- browse options based on price
- encouraged by filter options that appear on left hand side
- Select Album (Engage)
- Click on album of interest (latest release)
- see list of songs and associated popularity (rating)
- preview songs (30 sec) - go through all
- read band info
- frustrated there are no reviews
- evaluate if there are more than one song that is good
- Purchase Album (Engage)
- Hover over “Buy Album” button to consider the value of the album based on song preview and album price.
- Click “Buy Album” button
- Please there is no further “checkout process”
- Wait for Download (Exit)
- Downloads fast pleasing that it doesn’t take much time.
- impatient for entire album to finish.
- Play Music (Reflection)
- play entire album and listen to each song.
- burn to CD for backup
- Load music on mobile devices (Reflection)
- load entire album on iPhone and iPad.
- Listen to as travel music on daily commute.
This project was inspired by the Experience Map created by Erik Berkman from Little Spring Designs on improving the Starbucks experience.